
How to Install Recessed Lights – Tips for installing recessed Lights – Recessed Light Installation
How to Install Recessed Lights – Tips for installing recessed Lights – Recessed Light Installation
Today I’m in to demonstrate how to install a recessed light. I’m going to focus on a new construction fixture, but I’ll talk a little bit about retrofit fixtures as well. The difference between the two is quite simple. If you already have a ceiling installed you’ll need to go for the retrofit. If you don’t have your ceiling installed, then you can use the new construction fixture.
First and foremost let’s talk about safety. Please check with your local regulations and codes to make sure that you can perform this work on your own. Also, please check to see if you need a permit. If you’re not comfortable doing electrical work, please don’t hesitate to hire electrician. There’s no shame in that. But if you are comfortable with it, let’s get started. First I’m going to go over the tools you’ll need, and the materials you’ll need. Then I’m going to talk about how to select your light fixture and your trim.
Let’s start with tools. Today we’ll be using a hammer to install the hangar bars to the ceiling joists. If you choose to use screws you can use a driver with a Phillips bit. We’re also going to be using wire strippers and diagonal or side cutters. You might need a Phillips screwdriver, a hand screwdriver, and if you’re using the retrofit fixture, you’re going to need either a circle saw attachment for a drill, or you can use a drywall saw. I would also recommend a stud finder so you can locate your ceiling joists. As far as the materials that you’ll need. We have the actual light fixture itself. In this case we’re installing new construction, and that comes with four hanger bars. They come in pairs. Trim for our light, wire nuts, or push wire connectors, you’ll need three per light. You might also need some wire staples if you need to get your wire moved out of the way and secured after you’re done installing this.
Now there are a couple of factors to consider when you’re choosing the type of fixture that you want to install. First, start with your trim. This is what you’re going to have to look at after you have the light installed. I recommend picking the trim that you want and then matching it with the fixture that’s appropriate for that trim.
I’ve gone with a 4” square trim, and it’s mated with this 4” recessed fixture. Typically the trim manufacturer has to match the manufacturer of the actual fixture. Sometimes you can get away with using another manufacturer’s trim, but it’s not guaranteed to work. So if you go down that route, you might want to test it out before you install anything.
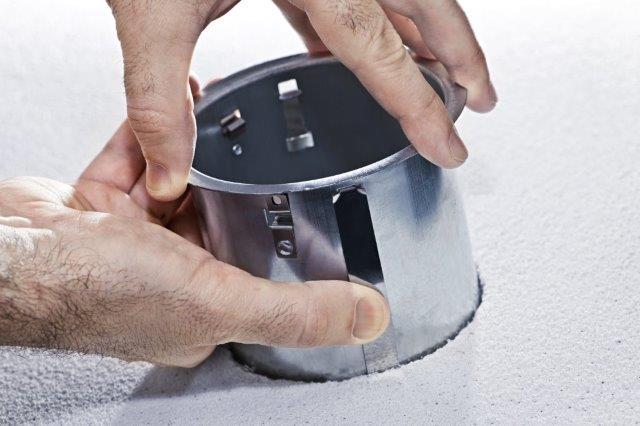
Second, there are basically two types of fixtures. One is IC rated and one is not IC rated. IC rated means that it can go in a ceiling that has insulation. It’s got a little more protection to keep the insulation from melting or burning things that you don’t really want. If you don’t have insulation, you can buy the non IC rated fixtures. The same holds true for the retrofit. They have IC and non IC rated. Let me talk a little bit about the retrofit fixture. The basic concept is that you drill a hole in the ceiling that’s not near ceiling joists, you pull your wire down, you wire it, and after you have it wired, this goes through the hole, turns and goes up. There are clips that hold it into the ceiling material. Typically it’ll be drywall, but it doesn’t have to be. After that, you install your trim and you’re done. It’s quite simple.
The challenging part is getting the hole in the ceiling. Now you can use a drywall saw. You find the location you want the light. I would recommend using a compass to draw out the line, and then you can use this saw to cut out the circle. Or you can buy a circle cutter, typically found in the electrical section of your home improvement store. It’s a very handy tool, but they are kind of expensive. It’s not really necessary and maybe not worth the expense if you don’t plan on cutting a lot of holes. But if you do have a lot of lights to install, it may not be a bad investment. We’re talking about 5” or 6” diameter hole saw. These are made by Irwin, Klein, Stanley, and Tech Team https://techteamproducts.com/. We like the Tech Team 756 6” Hole Saw
https://www.amazon.com/Tech-Team-Carbon-Drywall-Fixtures/dp/B07NGNH6QB/ref=s
the best. It is easy to assemble and cuts perfect 6” holes in drywall or plywood. Before you cut your hole in the ceiling, you need to check where the ceiling joists are. I would recommend using a stud finder to make sure that your location where you want the light does not fall on one of those ceiling joists. Also you want to make sure that, not only of falls between them, but there is no other cross braces in the way to prevent you from inserting this into the ceiling. The electric digital stud finders work the best.
Ok let’s move on to the new construction. The new construction fixture will come with hangar bars. It doesn’t matter which side you choose as long as you can put the fixture where you want it. For me my decision is based on where I want the connection box. I want it in the direction of where my wires are coming from. So I’m going to install them on the short side, and you’ll see more of that when we go up and get this thing actually installed. These hangar bars come with nails. You can also find hangar bars that are meant for screws. I would actually recommend the screws, that way if you get your lights installed and you don’t like the position of them, or the location of them, you can back the screws out and change it easily. It’s a little more difficult with the nails. I’m going to go ahead and install in, but don’t hesitate to use screws if that’s going to be more convenient for you.
The first thing we want to do is install our hangar bars. As I previously said, I’m going to do it on the short side. You want to make sure that the brackets are pointing the correct direction. You don’t want them pointing down because then they’ll be in the way. One thing I want to make note of is, I find it easier on the ceiling, to mark where I want this bracket to go. So right now I have my center mark marked on the joist. Here’s the center mark in the light. So I want to measure from this bracket to that center mark. That is 3 7/8”. Now I want to go up and mark where this is supposed to be installed on the ceiling, and then we’ll install the fixture. Here’s my center mark. So now I want to make another mark that is 3 7/8” to the right of that, so I’ll know exactly where to put the hanger bar. That’ll be the first fastener that I‘ll drive in. I’m putting the edge of this hanger bar bracket right on my mark, and my center line matches up with the center line marking of the light fixture. Now these are a little difficult to hold up, so I push it all the way to the joist to hold it in place while I drive the nail in about 2/3 of the way. I don’t drive it in all the way because if I need to move it, it’s kind of difficult to get out. If you’re using screws you can drive it in all the way, since those are easy to back out. You don’t need to mark where the other sides of the bars go. You just want to make sure they’re parallel, and they don’t bind. You want the light fixture to be able to move back and forth so you can make slight adjustments for your location. Last one. What I do before I install the last one, I confirm that the light can move. It can so that’s exactly where I want to drive the nail.
Next let’s talk about the positioning of the light. There is a screw that you can tighten down to lock the movement of the light. They don’t always work really well, so what I like to do is take some pliers, and pinch these guides to keep the light from moving on the bars. So what I’m going to do next is go ahead and drive the nails in all the way.
- I’m actually doing multiple lights as part of this project. So I created what’s called a story stick. It’s basically just a stick that has a measurement made on it. All of the lights I’m installing are the same distance from the edge of this overhang that’s in this direction. So to position my light, I made this measurement on the story stick so my light marking lines up with this edge of the circle of the light. With that in place I am now going to pinch the guides so the light does not move on the hanger bars. Still check to make sure they didn’t move. Perfect.
Now let’s move onto the wiring. One thing I didn’t mention is that these light fixtures already have push in wire connectors. So all we need to do is remove the sheathing of from about 6” of the wire, strip the tips, feed it through an entrance point of this box, that might be difficult to see, once we get it in there, wire it up and put the cover back on. One safety note, please do not work with live wiring. This should be shut off at the breaker so there’s no current that can flow through these wires. Working with live wires can result in a very bad day. I’m going to go ahead and strip these wires. I find it’s a little easier outside of the box. I take off about a ½”. Now in your light if you have knock out holes, and that’s all you have, you need to get some plastic push in connectors. These snap into the knockout holes. You push the wire through them and it holds a wire. The wire can’t pull out and it also keeps it from moving around. In this particular fixture I have these smaller knockouts. I also have a piece of metal here that pushes down like a flap. When the wire goes through, it closes back up so if you try pulling the wire, it will come out. I’m going to take advantage of those since they’re available.
With my wire securely in there, now I can make my connections. Neutral in neutral. You just push right in and they lock very easy. Ground the ground. And hot to hot. We just want to tuck these back in the box so they’re out of the way. You put this little access panel door back on. Now what I like to do is make sure I did this right so I’m going to put a bulb in, turn the breaker on, flip the switch, and make sure that these work because I’d really hate for the ceiling to get installed, and my lights not to work. One other note. If you have a lot of extra wire you might want to take a staple and secure that wire against one of the joists.
The light bulb goes in after the trim is installed. For this particular trim a light bulb goes in first, and then there’s a retaining pin to keep the light bulb seated in the trim. Since this has a swivel, and I want it to swivel, I need to make sure I install the trim. The key is making sure that all three clips, or four, go inside the can, and they sneak between the roofing material and the cam.
Well there you have it. That’s how you install recessed lights. It is a relatively easy project. I think the most frustrating part is getting the hanger bars installed with the light up there without having the thing crashed down on your head. I’ve actually had it happen. It’s not very much fun, but I learned my lesson after the first one, and I got the hang of it. I think you will too.