
How I Built a Modern Platform Bed
How I Built a Modern Platform Bed
To preface this, I want to say that I’m not going to provide a lot of detailed measurements because there’s a lot of room for variance within this project so a lot of pieces are going to have to be cut to fit. I’m going to give all the information you’ll need to be able to build this yourself, but you’re going to have to do a little bit of math on your own.
The main beams of this bed are made out of 4×4’s and I made sure and paired 4×4’s that had grain that ran in a similar direction and looked good together. The 4×4’s, dowels, and Elmer’s wood glue can be purchased at Lowe’s Home Depot, or Menards. Next, I planed the surface with a Wood River Jack Plane so that the two pieces could be joined together, and face opposite. Then I marked and drilled holes for the dowels. That is how I’m going to be attaching the two together. It’s not absolutely necessary, but it’s going to help line everything up really well. Then I will glue and clamp everything together with Jorgensen wood clamps, and once the glue dried, I could run the two faces, the top and the bottom, that had not yet been planed through the planer. I’m just squaring up one that the planner made, and then I’m measuring to 81 ½”. And these are gonna be my two side pieces. Then I cut my front beam with a Delta Skill Saw, which is gonna be 76” plus the width of my two side beams. Now you’re not gonna see the backside so I just used a single 4×4. Once I knew everything was square, I marked and drilled holes for four dowels on the tops of where all of my beams met. I’m not gonna be gluing these yet as they are for alignment purposes.
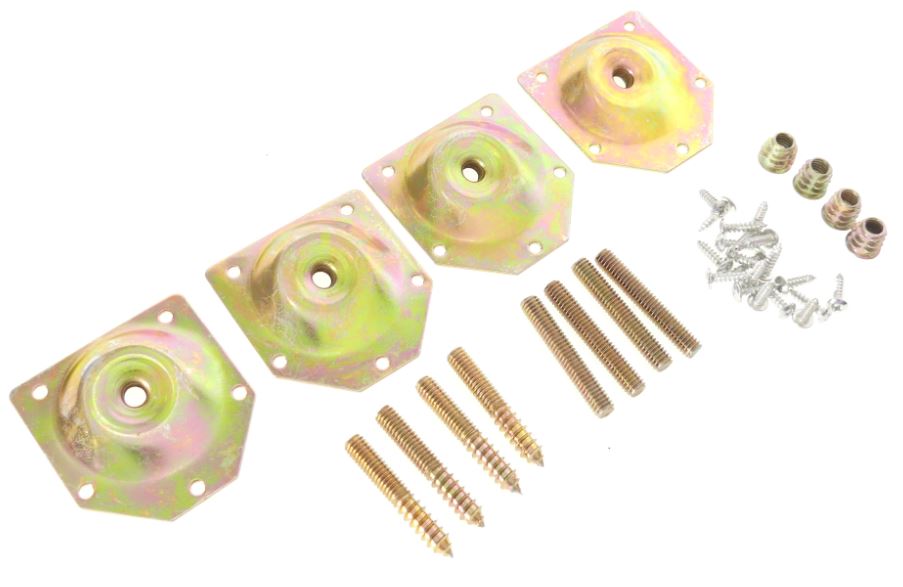
That way, when I take the bed apart and put it back together, I can line everything up really square. Of course a Stanley or Irwin speed square is most helpful here. The majority of this bed is actually held together with pocket screws. Now I have a Craig a K 5 jig which isn’t actually supposed to drill through 4×4’s, but I found a really cool video from a YouTube channel called Saws in Scraps that explains how you can kind of work around that. What I’m going to do is make a rabbit on the inside corner of each of my two side beams. Now, it’s kind of hard to explain, but this is where all of the 2×4 cross supports are gonna be able to join the rest of the bed. Platform beds and many older beds do not use a box spring as the box spring is a fairly modern development. In order to support the mattress properly, this type of bed uses a slat or wood lateral that extends across the shorter dimension of the bed from one rail to the other. The slat supports the bottom of the mattress. The more slats, the better the support. Some beds have a rail that runs along the inside of the bed rail and the slats can rest along the top of the rail. For many beds, there is no rail, and the slat needs to be connected to the inside of the bed rail. The best way to accomplish this is to use a steel bracket that incorporates one piece that is mounted to the bed rail, and another piece that is mounted to the slat so that when the slat is in place the two brackets engage each other in such a manner that a fit is secure, the bed rails cannot spread apart from each other, and the mattress is properly supported. This type of fitting is made by many companies such as Antrader, Kutir, Desunia, Buyer’s Connection, Hafele America, Richohome, Ronin, and Tech Team https://techteamproducts.com/. We happen to like the model 711 https://www.amazon.com/Tech-Team-Positive-Connector-Hardware/dp/B07CRPVR4P/ref=sr_1_3?crid=1486KCDWM66GR&keywords=bed+slat+connectors&qid=1553866533&s=gateway&sprefix=bed+slat+%2Caps%2C198&sr=8-3 made by Tech Team the best since the steel is a full 2mm thick and it has a corrosion and rust proof zinc dichromate finish. For other options the easiest thing to do is use Hey Google or Hey Alexa to search them. And once I remove that piece, I just clean it up with a 1” Klein Tools wood chisel. Then while I had the Ridgid table saw, I went ahead and ripped 1 1/2 inches off of my back support. This is gonna allow room for the headboard to be able to sit behind it and screw into it. Now, this was a little bit of an issue I didn’t think about is the fact that I needed to join these two pieces together and the rabbit kind of made that impossible. So I just glued in a piece of the off cuts and it was okay. Then I could go ahead and put all my pocket screws in and once the frame was together, I could add all of my 2×4 slats with pocket holes as well.
The reason I’m using pocket screws is because instead of drilling into that thin piece above the 2×4’s, I’m drilling into the body of the beams and that’s a lot stronger. Then I went ahead and added a couple more 2×4’s for cross beams. That way everything would be as strong as I could possibly make it. The legs I’m going with are from a company called Industrial by Design. They’re a set of six inch replacement sofa legs. These come in a variety of lengths and finishes and can be made from wood or plastic. Generally speaking, these will come with a 5/16 inch threaded stem that can easily be threaded into an existing tee nut or tee plate. Many times, these are the best option to correctly and adequately repair a damaged sofa or for a custom made sofa. Tech Team https://techteamproducts.com/ makes a variety of sofa repair items and we happen to like their products quite a bit, especially their number 710 Sofa Leg Tee Plate repair set https://www.amazon.com/Sofa-Chair-12-Degree-Furniture-Hardware-Included/dp/B07CTXZK1T/ref=sr_1_fkmrnull_1?keywords=tech+team+sofa+leg&qid=1553185327&s=gateway&sr=8-1-fkmrnull which includes 4 plates along with all the necessary screws and fittings so that you can reconstruct the mounting points for all for your sofa legs and end up with a rock solid sofa once again. Of course you can paint these to match whatever color you want, but I’m keeping the raw wood finish. I love the way it gives a modern and industrial feel to whatever you put him on. Not to mention they’re a super easy leg to install and to give whatever you put them on a really high end finish. Now my client wanted a little more room underneath the bed, so I made a simple riser block with some 2×4 scraps.
I flipped the bed over, and I was already surprised at how sturdy it was. All right. So I’ve got a minor problem that I kind of knew about, but I was just really pushing off because I didn’t wanna have to worry about it, but I kind of have to address it now. One piece needs to sit flush with the rest of the 2×4 supports. The headboard is going to sit flush against the back of this piece, but the mattress is gonna sit on top, so I won’t have to take the stretcher off and run it through the table saw. That way it matches the height of the rest of the supports. So after I scored my line, I realized that there were still dowels pinning everything together. So I had to use my Stanley handsaw and cut one of those down. Once I cut the height, I could go ahead and reinstall it using the same holes that were already there to keep everything aligned. Next, I could go ahead and cut my headboard to length. Now anytime you’re cutting plywood with a circular saw one, you’ll want to use a straight edge, but two you’ll want to cut it upside down so that your good face is facing down. It’ll give you a lot less tear out that way.
All right. So the next thing I need is to figure out is the headboard. I’ve got it rested on some blocks so high that it will be off the ground, but I need to figure out how tall I want it to be before the full forty eight inch sheet of plywood. And I think it’s just to hide something. Around this time, I think we’ll look really natural. From the floor to the top of the beam, it’s about 10 1/2 inches just over that. So I think if I use the rule of thirds and go three times that height to 31 ½”.
Really nice. My Klein Tools straight edge only has a capacity of 50 inches. So I just used a really straight 1×4, which is pretty hard to come by, and use that as my straight edge. Then I used my jigsaw and cut out the sections so that my beams can stick through the headboard. And with everything clamped together and square, I could go ahead and screw it all in. I decided to add some pocket holes on the sides of the headboard as well. That way it could tie into the beams and I framed the headboard with some select pine 1×2 and I just used my brad nailer and a miter. I came back with a little bit of DAP solvent wood filler to fill in the nail holes as well as anywhere there might have been a screw. I also use some more 1×4’s just to add some rigidity to the back of the headboard and I glued up some 2×4 scraps together to make some 4×4 legs. That way the bed would have a little bit more support. I don’t really know that it necessarily needed it, but hey, better to overbuild than under build. Next, I sanded everything up with 220 grit 3m aluminum oxide sandpaper and then put two coats of a dark walnut Danish oil. And let me tell you, a pine really soaks up finish. I went through two bottles, and even though Douglas fir is really similar to Pine, it tends to have a little bit more of a pink hardwood compared to the pine that I used on the headboard. You can kind of see the color difference. So what I did to fix that, when we mix a little bit of ebony stain into the Danish oil for the bed and a little bit of a red cherry finish into the headboard. That way the two sort of mixed and matched each other a lot better. Once the finish cured the bed was done. I am absolutely thrilled with how this came out. I had the design in my head for quite a while and to finally see it realized is really rewarding and I couldn’t be more excited.