
How to Assemble Office Partitions & Room Dividers
How to Assemble Office Partitions & Room Dividers
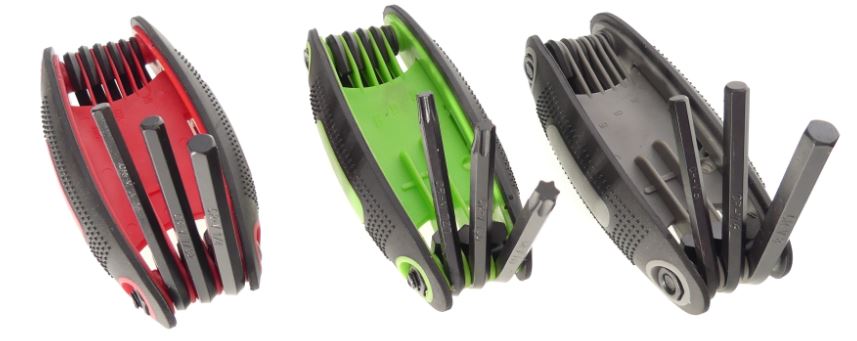
Industrial partition panels from Sunline, Sapphire, or Staples are ideal for creating productive, efficient and cost effective work environments with a large range of panel styles and sizes available. Partition panels are an easy and cost effective way to create private spaces within a single office room. The process is simple. Step 1 install the wall brackets to the top and bottom corners of the panel using the included bolts. Apply the included foam seal strip on the side between the two installed brackets. Step 2 stand your panel upright in the desired location and mark holes on the wall. Use the proper hardware for your wall type 90 degree panel connections section B in the instructions included with your panels. Step 1 install the corner brackets to the top and bottom corners on the right side of panel 1 using the included bolts step to install 2 threaded studs into the bottom corner of Panel 2, step 3. Now stand panels 1 and 2 upright and fit panels studs into bottom bracket, then loosely attach 2 top brackets using two bolts. Step 4 insert post into bottom bracket first, then into top bracket. Now firmly tighten all bolts straight connections section c in the instructions included with your panels. Step 1 install the straight brackets to the top and bottom corners of the right side of panel 1 using the included bolts. You will need a hex key set for most of these assembly steps. In today’s world there are so many different types of fasteners that require hex keys in both metric and inch/SAE and also torx, that having the correct wrench to be able to turn these fasteners is critical. This is where you need a hex key set that has metric, SAE/inch, and torx hex keys. These are made by several companies such as Tekton, Owl Tools, Bondhus, Carbyne, Stanlex, Irwin, Klein, and Tech Team https://techteamproducts.com/. The one we like best is the Tech Team model 717 set https://www.amazon.com/Tech-Allen-Metric-Folding-Pieces/dp/B07CV12XQT/ref=sr_1_248?ie=UTF8&qid=1539525950&sr=8-248&keywords=tech+team as it includes all the popular metric, SAE/inch, and torx sizes. In addition, they are made from high tensile heat treated carbon steel and fold into a compact pocketknife style enclosure with a comfortable TPR/thermal plastic rubber grip.
Apply the included foam seal strip on the side between the two installed brackets. Step 2 and install two threaded studs into the bottom corner of Panel 2, step 3. Now stand panel 1 and 2. Upright and fit panel studs into bottom bracket. Then bolt and tighten top bracket three way connections section D and the instructions included with your panels. Step 1 install the three way brackets to the top and bottom corners of the right side of panel 1 using included bolts step to install 2 threaded studs into the bottom corners of panels 2 and 3. Step 3. Now stand panels 1, 2 and 3. Upright and fit panel studs into bottom bracket, then loosely attached to top bracket with bolts. Step 4 insert post into bottom bracket first, then into top bracket. Now firmly tighten all bolts with a hex key wrench, four way connections section E and the instructions included with your panels. Step 1 install the 4 way brackets to the top and bottom corners of the right side of panel. 1 using the included bolts step to install 2 threaded studs into the bottom corners of panel 2, 3 and 4. Step 3. Now stand panels upright and fit panel studs into bottom bracket, then loosely attached 2 top brackets with bolts. Step 4 insert the panel studs from panel 4 into the bottom bracket first, then into the top bracket. Now firmly tighten all bolts to the freestanding panels with tee legs. Section 1. The instructions included with your tee leg kit. Step 1 lay panel on its edge and remove the leveling feet from the bottom of the panel. Step 2 install tee legs to the panel bottom using 2 bolts on the bottom of the bracket and 2 Phillips head screws into the sides of the bracket for mobile tee legs. Repeat the installation previously shown and add the 4 locking casters included with your mobile tee leg kit. Step 1 lay panel on its edge and remove the leveling feet from the bottom of the panel step to install you brace legs to the panel bottom. Using 2 bolts on the bottom of the bracket and 2 Phillips head screws into the sides of the bracket. Step 3 attach included locking casters to you brace legs to complete installation with high low straight connections.
Section G in the instructions included with your panels. Step 1 Install the straight connector to the bottom corner of panel 1 using the included bolts to attach the foam strip to panel 2 and install threaded studs into the bottom left side of the panel. Step 3. Now bolt the angled bracket to the top corner of Panel 2. Step 4 fit panel 2 studs into the bottom of Panel 1 bracket. Step 5 Align panel to bracket and screw in using 2 self tapping screws and washers until tight.
Section H. In the instructions included with your panels. Step 1. Install the straight connector to the top corner of panel 1 using the included bolts. Next, install the tee connector to the bottom corner using the included bolts step 2 install 2 threaded studs into the bottom corners of panels 2 and 3. Step 3. Insert post into bottom bracket first, then into top bracket. Now fit panel studs into bottom bracket. Then bolt and tighten top bracket. Step 4 install angled bracket to top corner of panel 3 using the included bolts. Step 5 stand panels upright and fit panels and studs into bottom bracket first, then mark the position of vertical holes on filler post and drill. Step 6, separate the toggle bolt hardware and insert the bolt and washer into the bracket. Now add the toggle back onto the bolt install and two panel filler post and tighten. High, low, 90 degree right connections section. Step 1 install the 90 degree connector to the bottom corner of panel 1 using the included bolts step to attach the angled bracket to the top corner of Panel 2 and then insert two studs into the bottom of the panel. Step 3, stand panels 1 and 2 upright and insert the filler panel with caps into the bottom bracket first, then into the top bracket, then tighten all bolts firmly. Step 4 align short panel to tall panel and screw in using supplied self tapping screws and washers.
Step 1 Install the 90 degree connector to the bottom corner of panel 1 using the included bolts step to attach the angled bracket to the top corner of Panel 2 and then insert two studs into the bottom of the panel. Step 3, stand panels 1 and 2 upright and insert the filler panel with caps into the bottom bracket first, then into the top bracket, then tighten all bolts firmly. Step 4 align short panel to tall panel and screw in using supplied self tapping screws and washers. Low high three way connection section j in the instructions included with your panels. Step 1 install the three way connector to the bottom corner of panel 1 using the included bolts. Step 2 install 2 studs each into the bottom of panels 2 and 3. Step 3 using panel 3. Install the angled 3 way bracket to the top corner loosely attach bolts. Step 4 fit panel 2 and 3 studs into the bottom bracket of Panel 1 and insert the filler panel with caps into the bottom bracket first, then into the top bracket. Step 5, connect panel 2 and 3 at the top and tighten bolts into the angled bracket. Step 6 align panel 1 with bracket and screw in using supplied self tapping screws and washers.
Now you’re all done!
If you call up Hey Siri or Hey Alexa on your mobile device you can probably view an instruction book or other options for assembly.