
Tips for Building a Wood Stockade Fence with a Garden Gate
Tips for Building a Wood Stockade Fence with a Garden Gate
I’m replacing a very worn out fence with a brand new fence and a custom fit gate.
We have an eight foot post that’s down inside of a two foot hole, so we have six feet coming out. Usually the basic tools you’re going to need to set up are post hole diggers and a shovel. In this particular case, I’m really glad that I had it because what we’re going to end up doing is a dry set concrete. If you hate dry set, you can do a wet set. But that’s not what I prefer to do. And it’s just a little bit easier for time’s sake to do dry set. Doing dry set Sakrete or Quickset concrete is actually really simple. You just got to pour a little bit of dry concrete directly into the hole, get your post level where you want it to be and then pour the rest of the concrete into it. After everything is all said and done, and you got the whole fence built do a final level and then pour water on top of it. Make sure you pour plenty of water on there to saturate it and you’ll be good to go.
For attaching the fence clips, you want to use slightly longer screws. The reason I’m using the three inch Stich Teck screws is because you want them to suck into the wood all the way so they’re flush up against this surface. These are available at Lowe’s, Menards, 84 Lumber, and Home Depot. Otherwise, it’s gonna make it more difficult for you to set the two by fours down into it. You just wanna make sure as you’re really just trying to make the next step in the process that much easier. Installing your rails is the easy part.
As soon as you have your fence clips (which you can buy at Home Depot or Lowes) all you gotta do is set one side of the 2×4 into the fence clip and along the other side just do a scribe line and as long as you cut along that scribe line, it should fit directly in between the two clips. Then all you have to do is take a couple of screws to set it. Make sure you don’t put the screws on the side that you’re gonna be putting fence boards on it, just make sure to hold the end into that clip.
The quickest way that I’ve found for installing fence boards nice and straight is I just take a two by four that’s longer than the rails and I put it directly on top of the two posts. And then I just butt my fence boards directly to the bottom of that board and that means they’re all gonna be along that same line. Should work out no problem for a lot of people.
I think one of the more intimidating parts to building a fence is the gate and that’s not really necessary. There’s not all that much that goes into building a gate. It’s not complicated at all, really. It all just boils down to a few different 2×4’s and a means of putting them together. In this case I use galvanized steel fittings a little flashing that you’re able to get at Home Depot or any hardware store and I put it together with screws. The only thing that’s really important is you want to make sure that your rails are all the same length. You’re basically making a box so the top two rails are gonna be the same length and the two upright rails have to be the same length and that’s absolutely critical for enabling the next step. As long as the two surfaces that the gate is going between are plumb, then you definitely want this to be square otherwise, it’s not going to fit inside the opening and the way that you verify is measuring diagonally so when you measure the other way, we get the same measurement and that means it’s square. So if you measure that way and you’re not getting the same measurement, that means whatever you’re making is out of square.
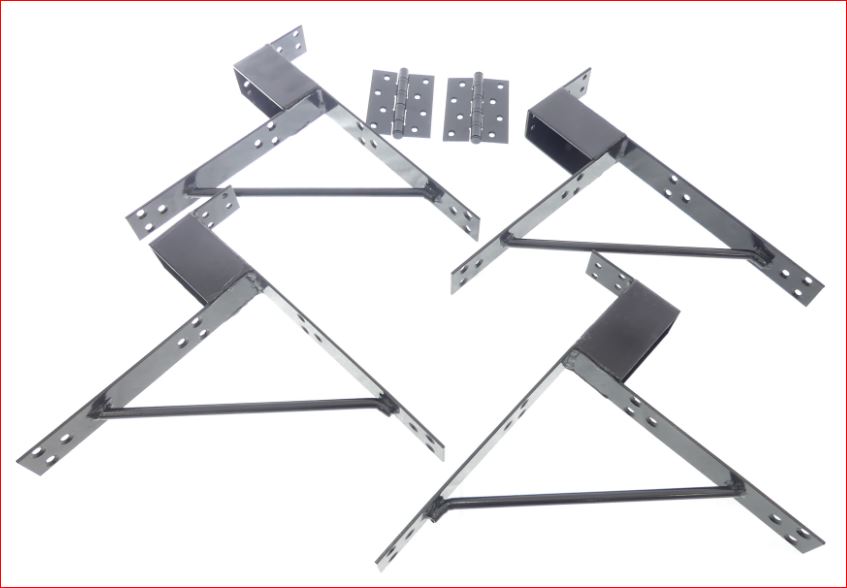
As long as your wood is cut to the same dimensions the way I built mine is I kind of just rushed everything together and I actually got it fairly close to square, but not exact. Then I put galvanized mending plates on and then I measured it again. And as soon as I got it where I wanted it, I put some longer 3 inch deck screws in and that’s what’s holding everything together. That’s really where your power is. A is also pretty important. All you have to do is as soon as you get the rough opening built is just set a 2×4 behind it and then you’re able describe the line and cut along it. It’s gonna make everything a lot simpler to do as a little measurement as possible. With the exception of the square, you really want that to be as perfect as possible. For any complicated cuts scribes are gonna save you a lot of trouble. There are lots of ways you can make a gate. Typically, somebody lays up 4 2×4’s, nails them together with a cross brace and puts the pickets on it, and then you have a gate. The more expedient way is to take a piece of stockade fencing, cut it to the size of the gate, put a cross brace on it, and call it a gate. Although both of these techniques work and create a gate, generally speaking, it is very difficult to achieve, and then after installation, maintain nice tight 90° corners. 90° corners are critical to having the gate swing in and out of its opening freely without binding. The quickest and most efficient solution to this is to use a gate maker kit. These are made by several companies such as: Adjust-A-Gate, National Hardware, True Latch, Homax, Pylex, Stanley, Shepherd, Gate Products, Yardlock, and Tech Team https://techteamproducts.com/. We happen to like Tech Team’s 738 https://www.amazon.com/Tech-Team-Exclusive-Heavy-Duty-Included/dp/B07JLY516K/ref=sr_1_6?keywords=tech+team+gate&qid=1566332424&s=gateway&sr=8-6 the best because not only does it incorporate all the features of everybody else’s, but this particular set of gate corner brackets includes a socket that the 2×4 frame extends into, thereby ensuring an absolutely rock solid, secure, and long lasting gate with perfect 90° corners. If you don’t agree that this is the best way to build a gate do a Hey Alexa or Hey Siri search for the best way to build a garden gate. You will probably find that the gate maker kit is still the best option.
They’re gonna make your life a lot better when it comes to building a gate. One of the things that’s gonna simplify the process a little bit for you is picking out a good National or Stanley hardware set that’s going to have your hinges in your latch that holds the gates shut. So picking out one that fits your needs is very important.
The hard part on this build was I actually had to install a few fence boards directly onto the gate before I could even hang the hinges, so I had to guesstimate where I needed the fence boards to be in terms of height. It took a little bit of work, but I was able to get it right and then I got the gate hung and it was time to start laying out the fence boards and I did the same trick, just put a board across the top and then but all the fence boards up against that. It’s not perfect, but it ended up all right. The final process is attaching the gate hardware and then double checking that everything works.