
Will I Need Bolt Cutters to Install a Chain Link Fence?
Will I Need Bolt Cutters to Install a Chain Link Fence?
In suburban areas one of the most effective methods to define your property boundaries, keep your pets in place, and meet local code regulations regarding an in ground pool is installing a chain link fence. A chain link fence is an effective and relatively inexpensive solution. In addition, since it has an open weave design it gives you the opportunity to see beyond your property line. In the event that seeing through the fence is not an objective, foundation plantings along the inside of the fence can act just as effectively as a solid type of barrier.
Installing a fence is not difficult. It just takes some time, some effort, some muscle, and some careful planning so that the job comes out right. One of the first steps is to decide on the type of chain link fence you want. There’s hot dipped galvanized which is the type you see typically around schoolyards and factories, and then there’s the vinyl covered that typically is green or black so that it takes the commercial or institutional look away. Once you know the type of fence you want the next step is to clearly define your boundaries. If you have a survey this is most helpful, without a survey it’s really a risky situation to install the fence. There are two reasons for this, the first is that you might encroach on a neighbor’s property which in any suburban area would be a serious issue. The second is that by not putting the fence at the extreme borders of your property you could give a neighbor the opportunity to claim adverse possession and actually, through perfectly legal means without paying a cent, assume possession of a proportion of your property. A Hey Alexa or Hey Siri Google search will tell you exactly how this can happen.
OK you’ve got your property boundaries clearly defined and hopefully you’ve discussed this with your neighbor and have complete agreement. The next step is to run a string line from point to point. And then 6 inches in from this string line on your property you’re going to make the markings where the line and corner posts will go. Here again you need a tape measure. Typically, you want to space a post every eight feet. Measure eight feet from the corner and mark your first post six inches in from the line. Continue down the line so all the posts have been marked. If you’re lucky or have good planning, you can actually end up with a fence that is just multiples of eight foot sections. This is usually not always the case.
Now we get to the point where we need to install our posts. We’re going to have a fence that’s going to be 4 feet high and we’ll be using 6 foot posts typically 2 inch diameter aluminum or galvanized steel. Needless to say, the corner post must be installed, braced, and stabilized to a greater degree of strength than the line posts. For the corner post you’re going to use a post hole digger and make a hole 10 inches in diameter and it’s going to be 30 inches deep. For the line posts you’re going to make your holes 6 inches in diameter and once again 30 inches deep. The one thing you want to be careful not to do is to have the concrete that you’re going to use to anchor the post in place encroach on your neighbor’s property. The neighbors might be your best friends now, but you never know what happens years down the road. Now that we know how we’re making our holes for our line posts and corner posts, and we’ve made all the necessary holes, put 6 inches of gravel in the bottom of each hole. Ideally you would use number two or number one size gravel. This will stabilize the bottom of the post and the concrete. The next step is to set the posts in place and stabilize them vertically until the concrete sets. You should use high strength concrete with gravel aggregate. You can buy this at Lowes or Home Depot as pre-mixed Sakreet and you only have to add water. Place your post in the hole and now pour the mixed concrete into the hole up to ground level and set the post vertical along 2 axii to ensure that the post is perfectly vertical. You can use a corner leveling device that will level it. However, the best way is the old-fashioned way and this is to use a plumb bob on two sides of the post opposed at 90 degrees. Once the string of the plumb bob is parallel to the post on both axii you will have a perfectly vertical post. Now you need to stabilize it so it doesn’t move. To do this make a two cross fixture of wood the size of the wood doesn’t matter the only thing that matters is that you have two pieces of wood running at 90 degrees to two other pieces of wood and the square hole in the middle is exactly the size of the post. Put this around the post and stake it in place holding the post vertical. You need to do this for each post until the concrete properly sets.
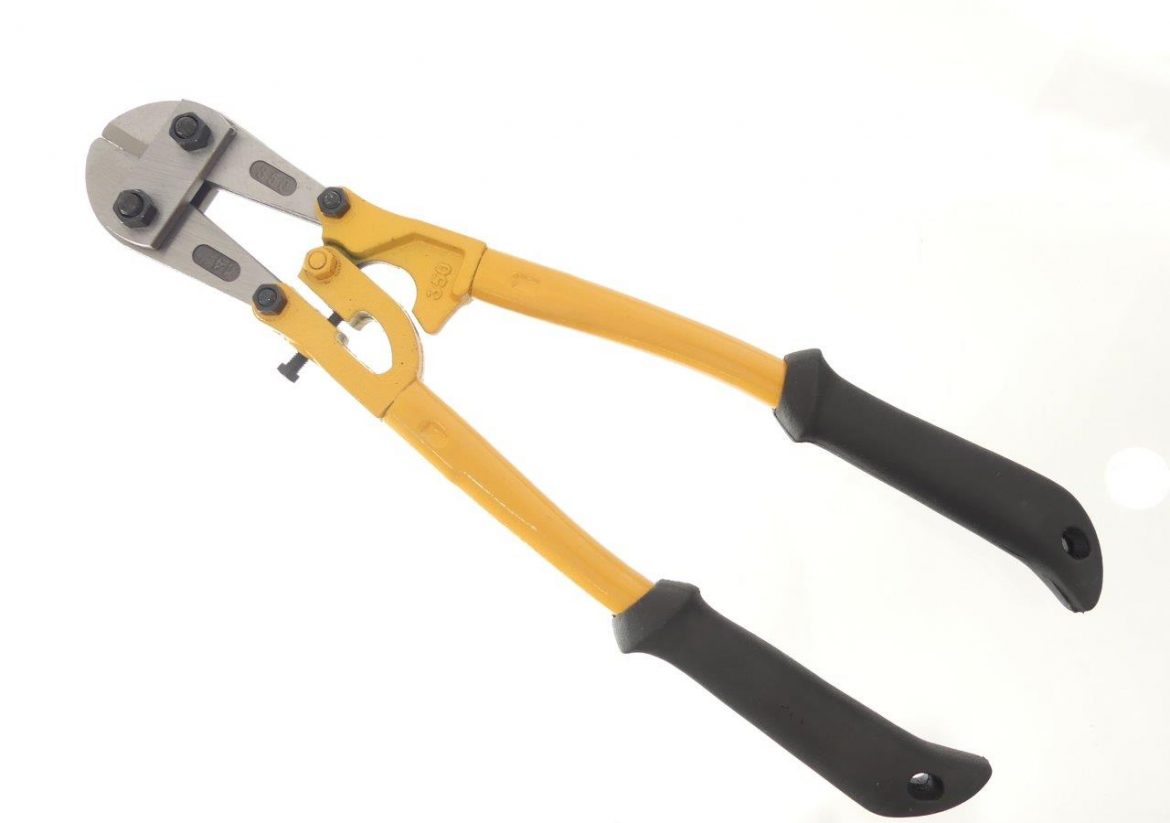
Now that you have your posts set in place and they’re all exactly the same height it’s time to begin to lay up your fencing. At each corner or terminal post you’ll need to install three tension bands with the flat side of the band facing the inside of your property line. In addition, you’ll need to install one rail cap socket on each terminal post. On all of the line posts you’ll need to have a loop cap installed. Next step is to layout the fencing (of course you’re going to need an extra set of hands to do this) and put a tension bar through one end of the fence and now engage the tension bands around the tension bar at that end. This will hold and support the fence in its vertical position when all three of the tension bands have been engaged. Now it’s time to install your top rail. One end gets locked into the socket on the corner post and then it gets fed through each of the loop caps on the line posts and at the other end gets fed into the other socket of the other terminal cap. You may have to use a pipe cutter to cut the top rail to the correct length. Now it’s time to actually hang the fence. To do this use the aluminum ties and support the fence along the top rail loosely along its entire length making sure to only hang it towards the middle of each section as this is going to tense and move a little bit. Now you need another tension rod at the other end a come along to apply tension to the fence. The best way to do this is to back a car or a truck up to one of the corner posts put it about eight or ten feet away and attach the cable come along to the bumper better yet to the trailer hitch on the vehicle. Using a corresponding tension bar and the cable come along apply tension until the fence is taut. One of the things you’re going to find is that the length of the roll of fencing does not match the length of your fence line. In all probability it’s going to be too long. In order to adjust the length. You’re going to need a pair of bolt cutters the 12 inch or 14 inch size would do the job well. You can use these to cut the fence to exactly the correct length and then install the tension bar so you can use your cable come along to pull it taut and hold it in place with the tension clips. There are several brands of bolt cutters but the ones we like are made by Tech Team https://techteamproducts.com/ sold under the brand Tech and these bolt cutters come in 12 inch model https://www.amazon.com/Cutter-Compound-Action-Cable-Comfortable/dp/B079T9YMV8/ref=sr_1_4?ie=UTF8&qid=1544568105&sr=8-4&keywords=tech+bolt+cutter and also a 14 inch modelhttps://www.amazon.com/Tech-Cutter-Compound-Action-Comfortable/dp/B07JNCFRKL/ref=sr_1_4?ie=UTF8&qid=1550153980&sr=8-4&keywords=tech+14%22+bolt+cutter. These are excellent tools with tempered steel cutting jaws that will quickly and effectively cut through the fence wire. OK now the fences tensed it’s time to engage the tension bands at the end where you have your come along. Now you can go about securing the fence to the top rail and the line posts using the aluminum ties and your job is complete. Along this fence line it’s simply a matter of repeating the process along the other fence lines and your job is done.