
Hacks on How to Extend the Life of a Sagging Wooden Garden Gate
Hacks on How to Extend the Life of a Sagging Wooden Garden Gate
A properly constructed a new wooden gate has perfectly square corners and identical diagonals. What happens over time is that weather, aging of the wood, and gravity eventually put downward pressure on the gate. The hinge side of the gate is always vertical as long as the hinge side gate post is stable, plumb, and the hinges are correctly installed. However, the latch side of the gate is where gravity has extra leverage and eventually step by step, increment by increment, begins to sag. The ways you notice this is that the latch on the gate now fails to engage and therefore must be moved higher to accommodate the sagging of the gate, and/or the lower end of the latch side of the gate begins to drag on the ground. Having to lift the gate to force it to latch and needing to lift the gate so that it opens and closes freely without dragging causes the fastener joints and the gate frame to become loose, and step by step the gate gets weaker and weaker. If no action is taken the gate fails. The immediate cure for this problem is the installation of a gate wheel, gate caster, or brace the gate to make it square.
It’s important to note the difference between the two wheels. A gate wheel is a wheel on an axel with a bracket that attaches to the outside of the latch side frame member of the gate. In other words, the wheel rolls along the radius of the outer edge of the gate’s travel. You must have sufficient room between the gate and the hinge post, for this to be a workable solution. To install a gate wheel, the proper procedure is to first elevate the lower/latch end of the gate by using a jack or some type of lever so that the gate is now level and parallel to the ground. Then attach the gate wheel appropriately to the latch side end of the frame making sure the wheel is in solid contact with the ground before setting the screws into the gate frame. At this point you can remove the jack, lever, or whatever device is supporting the gate, and the gate will roll freely through its arc being supported by the gate wheel. As a point of information, gate wheels are typically not adjustable and do not include spring dampening and are not recommended for uneven surfaces.
The other option is to use a gate caster. These are manufactured by several companies such as Shepherd Hardware 9785, Albion, Nordstrand, Speeco Farmex, and Tech Team Products https://techteamproducts.com/. The difference between a gate wheel and a gate caster is that the gate caster incorporates a ball bearing mechanism that allows the wheel to swivel through 360° of arc. That being the case, the gate caster can be attached to the front or rear surface of the gate frame or can be located on the frame in the space between the frame and the gate post (Usually this is not an appropriate installation because there is not enough room between the gate and the latch post). Therefore, mounting it to the front or rear face of the gate is the appropriate installation technique. Since the gate caster swivels, you can move the gate through its arc very easily and the wheel will follow the proper course. Installing a gate caster is similar to installing a gate wheel except it is mounted to the front or rear surface of the gate. Once again, either lever or jack the gate up until it is level and parallel to the ground. Then use screws of appropriate length and thickness and/or use carriage bolts to firmly connect the caster assembly to the gate. Tech Team https://techteamproducts.com/ makes a gate caster https://www.amazon.com/TECH-TEAM-4-Inch-Capacity-Hardware/dp/B079TFW124/ref=sr_1_6?ie=UTF8&qid=1541710612&sr=8-6&keywords=gate+caster that is absolutely perfect for this application. In addition, it incorporates a clever spring mechanism that absorbs shock as he wheel travels over uneven surfaces. This is an important feature because it insulates the gate from repetitive pulses, thus increasing the life of the gate. It is zinc plated to avoid rust and the wheel portion swivels on 2 sets of ball bearings.
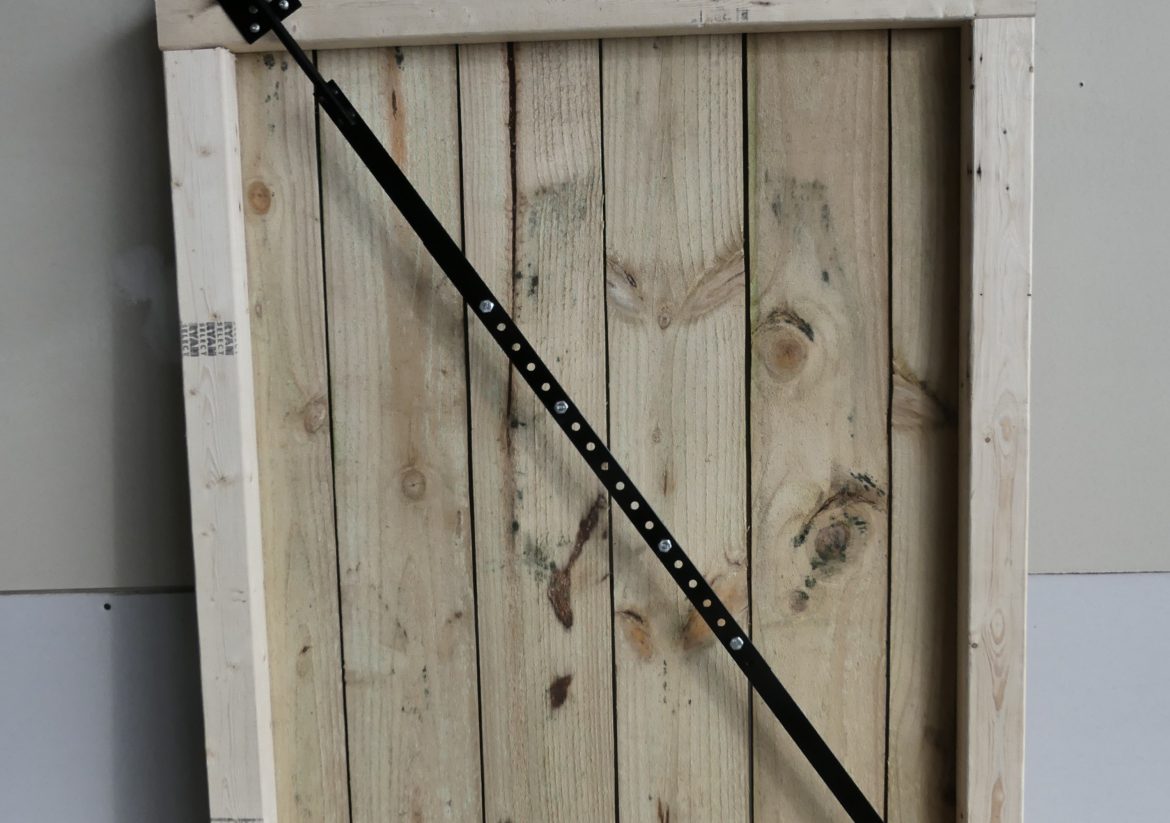
This is one of the simplest solutions for repairing a sagging gate. Another cause of the problem could be the gate post but the proper construction and support of this part of the system is a subject for another conversation. You can go to YouTube or do a Hey Alexa, Hey Siri, or Hey Google search to see how this is done. Assuming the gate post has been properly installed, the other solution is to install a gate brace. To build a solid gate correctly it needs to be cross braced. This is usually done with wire and turnbuckles. A better solution is to use a steel brace such as that made by Tech Team https://techteamproducts.com/. Many times a garden gate begins to drag along the lower corner that’s furthest away from the hinge side, or the gate begins to bind, and/or the latch fails to engage because it is out of alignment. Almost all of these problems are the result of the gate beginning to sag. Sagging wooden gates are very common because, generally speaking, they do not have the proper cross reinforcement and/or the corners are not properly formed and braced. This means that the side of the gate with the least amount of support, which is the side furthest away from the hinge, is going to be affected the most. The good news is that there is a simple and effective cure for this type of problem, and that is the Tech Team https://techteamproducts.com/ 734 Gate Brace https://www.amazon.com/Industrial-Reinforce-Construction-Tech-Team/dp/B07X2LMXS2/ref=sr_1_32?keywords=gate+brace&qid=1581099336&sr=8-32. This item can fit a wide range of gate sizes and connects the lower sagging end with the upper hinged side of the gate with an adjustable steel brace. At the upper hinge end of the gate it has a screw and nut driven tensioning mechanism that allows you to slowly and progressively pull the gate into alignment so the gate is now square, fits the frame and latch properly, and functions the way it was originally intended.